When autumn arrives, my kitchen becomes a wonderland of warm spices and comforting flavors. There’s something magical about the combination of pumpkin and cream cheese that speaks directly to my soul. If you’ve ever found yourself torn between making a traditional pumpkin pie or a rich cheesecake, I’m here to tell you that you no longer need to choose. These Pumpkin Pie Cheesecake Bars bring together the best of both worlds in one irresistible dessert.
I’ve been perfecting this recipe for years, and it’s become my most requested fall treat. The buttery graham cracker crust provides the perfect foundation for layers of velvety cheesecake and spiced pumpkin filling. What makes these bars truly special is how they transform two classic desserts into portable, shareable squares that are perfect for everything from casual family gatherings to elegant holiday celebrations.
Why You’ll Fall in Love With These Pumpkin Pie Cheesecake Bars
Before diving into the recipe, let me share why these bars have become my autumn baking staple:
- Perfect Texture Contrast: The crisp crust, creamy cheesecake layer, and silky pumpkin topping create a symphony of textures in every bite.
- Make-Ahead Friendly: These bars actually taste better after chilling overnight, making them ideal for busy holiday planning.
- Crowd Pleaser: Even self-proclaimed pumpkin skeptics have been converted by these bars!
- Portable Perfection: Unlike traditional pies or cheesecakes, these bars can be easily transported to potlucks and gatherings.
- Freezer-Friendly: Make a double batch and freeze some for later—they thaw beautifully.
I’ve shared these at countless autumn gatherings, and the recipe card exchanges that follow have become something of a tradition. Let’s get into what you’ll need to make these heavenly bars yourself!
Essential Ingredients
For the Crust
- 2 cups graham cracker crumbs (about 16 full sheets)
- 1/4 cup granulated sugar
- 1/2 teaspoon ground cinnamon
- 1/2 cup (1 stick) unsalted butter, melted
For the Cheesecake Layer
- 16 ounces (2 blocks) cream cheese, softened to room temperature
- 3/4 cup granulated sugar
- 2 large eggs, at room temperature
- 1 teaspoon pure vanilla extract
- 1/4 teaspoon salt
For the Pumpkin Layer
- 15 ounces pure pumpkin puree (not pumpkin pie filling)
- 3/4 cup heavy cream
- 2 large eggs, at room temperature
- 2/3 cup packed light brown sugar
- 2 teaspoons pumpkin pie spice
- 1 teaspoon ground cinnamon
- 1/4 teaspoon ground nutmeg
- 1/4 teaspoon salt
For the Topping (Optional)
- 1 cup heavy whipping cream
- 3 tablespoons powdered sugar
- 1 teaspoon vanilla extract
- Ground cinnamon for dusting
Essential Equipment
Before we begin, make sure you have these tools on hand:
- 9×13-inch baking pan (metal works best for even baking)
- Parchment paper (for easy removal)
- Mixing bowls (various sizes)
- Electric mixer (stand or hand-held)
- Rubber spatula
- Measuring cups and spoons
- Optional: kitchen scale for precise measurements

Step-by-Step Instructions
Preparing the Crust
- Preheat your oven to 350°F (175°C) and position a rack in the center.
- Line your 9×13-inch baking pan with parchment paper, leaving some overhang on the sides to create “handles” for easy removal later.
- In a medium bowl, combine the graham cracker crumbs, sugar, and cinnamon.
- Pour in the melted butter and mix until the mixture resembles wet sand. The perfect consistency is when the crumbs hold together when pressed between your fingers.
- Press this mixture firmly and evenly into the bottom of your prepared pan. I like to use the bottom of a measuring cup to create a smooth, compact layer.
- Bake the crust for 8-10 minutes until it’s lightly golden and smells fragrant.
- Remove from the oven and allow to cool while preparing the filling layers. Keep the oven on.
Pro Tip: For an extra flavor dimension, try adding 2 tablespoons of finely chopped pecans or walnuts to your graham cracker mixture.
Creating the Cheesecake Layer
- In a large bowl, beat the softened cream cheese with an electric mixer until completely smooth, about 2 minutes. Scrape down the sides and bottom of the bowl as needed—those cream cheese lumps can be sneaky!
- Add the sugar and beat until well combined and fluffy, about 1 minute.
- Add the eggs one at a time, beating well after each addition. This patience creates the silkiest texture.
- Mix in the vanilla extract and salt until just combined.
- Pour this cheesecake mixture over the cooled crust and spread it into an even layer.
- Gently tap the pan on the counter a few times to release any air bubbles.
Baker’s Note: Ensuring your cream cheese and eggs are truly at room temperature is crucial for a smooth cheesecake layer. I recommend taking them out of the refrigerator at least 2 hours before baking.
Preparing the Pumpkin Layer
- In another large bowl, whisk together the pumpkin puree, heavy cream, eggs, and brown sugar until smooth.
- Add the pumpkin pie spice, cinnamon, nutmeg, and salt. Whisk until fully incorporated and the mixture looks silky.
- Carefully pour the pumpkin mixture over the cheesecake layer, spreading it gently to avoid disturbing the layers.
Flavor Enhancement: The key to depth of flavor is in the balance of spices. Freshly grating your nutmeg makes a noticeable difference!
Baking the Bars
- Carefully transfer the pan to the preheated oven.
- Bake for 45-50 minutes, or until the center is almost set but still has a slight jiggle. The edges should be slightly puffed and beginning to pull away from the sides of the pan.
- Turn off the oven, crack the door open about 1 inch, and let the bars cool in the oven for 1 hour. This gradual cooling helps prevent cracks.
- After an hour, remove the pan from the oven and let it cool completely at room temperature, about 2 hours.
- Once cooled, cover and refrigerate for at least 4 hours, but preferably overnight.

Adding the Whipped Cream Topping (Optional)
- When ready to serve, prepare the whipped cream topping by beating the heavy cream, powdered sugar, and vanilla in a chilled bowl until stiff peaks form.
- Remove the chilled bars from the refrigerator and use the parchment paper handles to lift them out of the pan.
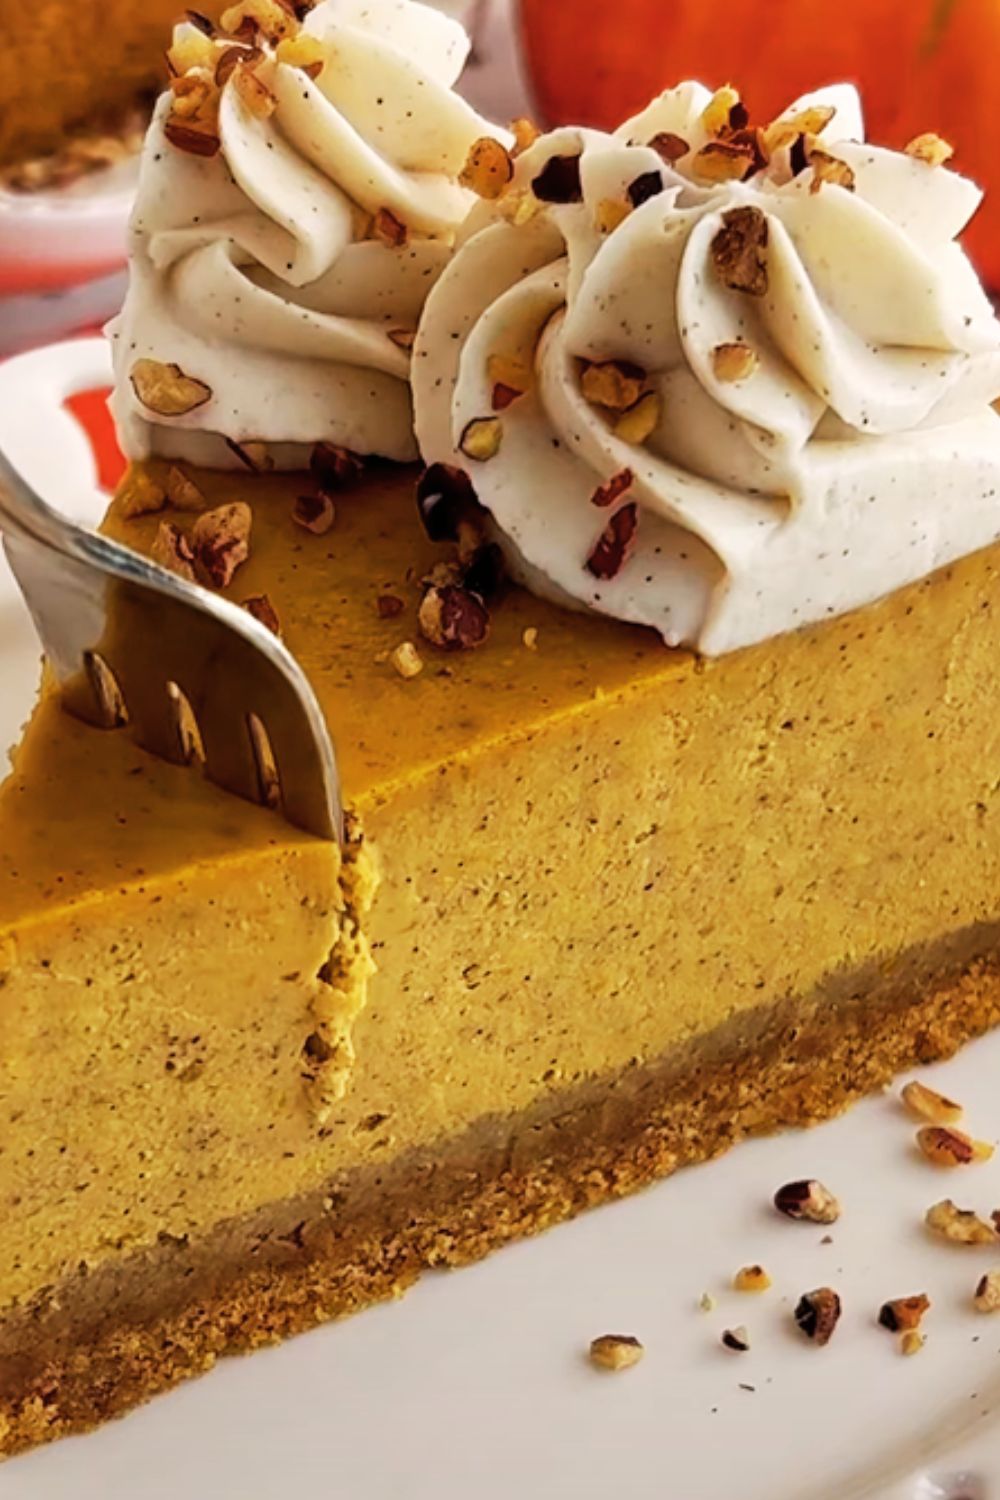
- Spread or pipe the whipped cream over the top.
- Lightly dust with ground cinnamon for a beautiful finish.
- Cut into bars with a clean, sharp knife, wiping the blade between cuts for perfect squares.
Nutritional Information
For those keeping track of nutritional content, here’s a breakdown per serving (based on cutting the pan into 16 bars):
| Nutrient | Amount per Serving |
|---|---|
| Calories | 375 |
| Total Fat | 26g |
| Saturated Fat | 15g |
| Cholesterol | 125mg |
| Sodium | 230mg |
| Total Carbohydrates | 34g |
| Dietary Fiber | 1g |
| Sugars | 25g |
| Protein | 5g |
| Vitamin A | 75% DV |
| Calcium | 8% DV |
| Iron | 6% DV |
Note: Nutritional values are estimates and will vary based on specific ingredients used.
Storage and Make-Ahead Tips
One of the reasons I love these bars so much is their convenience. Here’s how to store them:
Refrigerator Storage
- Keep the bars in an airtight container in the refrigerator for up to 5 days.
- If adding whipped cream topping, it’s best to do so right before serving rather than storing the bars with the topping.
Freezer Instructions
- Cut the chilled bars into squares.
- Wrap each bar individually in plastic wrap, then place in a freezer-safe container or zip-top bag.
- Freeze for up to 3 months.
- Thaw overnight in the refrigerator before serving.
Pro Tip: For an easy dessert emergency stash, freeze individual bars on a baking sheet until solid, then transfer to a container with parchment paper between layers.
Common Troubleshooting
Even experienced bakers encounter challenges. Here are solutions to common issues:
Cracks in the Surface
- Cause: Overbaking or cooling too quickly
- Solution: Follow the gradual cooling method and don’t skip the “cooling in the oven” step.
Soggy Crust
- Cause: Not pre-baking the crust or using too much butter
- Solution: Make sure to pre-bake the crust and measure the butter precisely.
Uneven Layers
- Cause: Pouring the pumpkin layer too forcefully
- Solution: Pour slowly and gently, and spread with a light hand.
Filling Not Set
- Cause: Underbaking or cutting before properly chilled
- Solution: Ensure bars are completely cooled and chilled for the full recommended time before cutting.
Variations to Try
While the classic recipe is divine, here are some variations I’ve experimented with over the years:
Gingersnap Crust
Replace graham crackers with gingersnap cookies for an extra spicy kick that complements the pumpkin beautifully.
Swirled Cheesecake Pumpkin Bars
Instead of distinct layers, reserve some of the cheesecake batter and create a marbled effect by dolloping it over the pumpkin layer and swirling with a knife.
Chocolate Bottom
Add a layer of melted chocolate over the baked crust before adding the cheesecake layer for a chocolate-lover’s twist.
Streusel Topping
Create a simple streusel with butter, brown sugar, flour, and chopped nuts to sprinkle over the pumpkin layer before baking for added texture.

Serving Suggestions
These bars are a standout dessert on their own, but here are some ways to elevate your presentation:
- Serve with a drizzle of caramel sauce for extra decadence
- Pair with a scoop of vanilla bean ice cream for a temperature contrast
- Offer alongside a steaming mug of spiced cider or chai tea
- Create a dessert board with these bars as the centerpiece, surrounded by apple slices, candied pecans, and dark chocolate squares
- For brunch, serve with a dollop of maple-sweetened Greek yogurt instead of whipped cream
The Science Behind Perfect Cheesecake Bars
Understanding a few baking principles can help ensure success:
The Importance of Room Temperature Ingredients
Cold cream cheese won’t blend smoothly, resulting in a lumpy texture. Room temperature ingredients incorporate evenly, creating that signature silky cheesecake texture.
Why We Bake in Phases
Pre-baking the crust creates a barrier that prevents sogginess. The lower water content in the cheesecake layer means it sets differently than the pumpkin layer, which is why layering works better than mixing them together.
The Slow Cooling Method
Dramatic temperature changes cause contraction that leads to cracks. The gradual cooling process allows the proteins to settle slowly, maintaining that perfect smooth top.
| Baking Stage | Temperature | Time | Purpose |
|---|---|---|---|
| Crust Pre-Bake | 350°F | 8-10 minutes | Solidify crust, prevent sogginess |
| Full Bars Bake | 350°F | 45-50 minutes | Cook through while maintaining moisture |
| Oven Cooling | Decreasing | 60 minutes | Prevent rapid temperature change and cracking |
| Room Temp Rest | Room Temp | 120 minutes | Allow structure to set |
| Refrigeration | 35-40°F | 4+ hours | Finalize texture and enhance flavor |
Seasonal Adaptations
While these bars shine brightest during fall, they can be adjusted for year-round enjoyment:
Spring Version
- Add lemon zest to the cheesecake layer
- Top with fresh berries instead of whipped cream
Summer Twist
- Use a lighter hand with the spices
- Serve chilled with a fresh peach compote
Winter Holiday Edition
- Add a tablespoon of orange zest to the pumpkin mixture
- Garnish with sugared cranberries and rosemary sprigs
Questions & Answers
Q: Can I use canned pumpkin pie filling instead of pure pumpkin puree? No, I don’t recommend this substitution. Pumpkin pie filling already contains sweeteners and spices in unknown quantities, which would throw off the balance of flavors in this recipe. Stick with pure pumpkin puree for best results.
Q: Can I make these bars without the cheesecake layer? You could, but they would essentially become pumpkin pie bars. The magic of this recipe is in the combination of textures and flavors. If you’re looking for a simpler recipe, I’d suggest searching specifically for pumpkin pie bars.
Q: How do I know when the bars are done baking? The center should have a slight jiggle when gently shaken—similar to how Jell-O looks when set but not completely firm. The edges should be slightly puffed and beginning to pull away from the sides of the pan. Remember that the bars will continue to set as they cool.
Q: Can I use low-fat cream cheese? While you technically can, I don’t recommend it. Full-fat cream cheese provides the rich, creamy texture that makes these bars special. Low-fat versions contain more water and can result in a less stable structure.
Q: My family doesn’t like graham crackers. What can I use instead? Gingersnaps make an excellent alternative crust, as do digestive biscuits. You could also try vanilla wafers or even chocolate cookies for a different flavor profile. Just keep the proportions the same.
Q: Can I add chocolate chips to this recipe? Absolutely! Fold 1 cup of mini chocolate chips into either the cheesecake layer or the pumpkin layer before baking. White chocolate chips also pair beautifully with the pumpkin spice flavors.
Q: How far in advance can I make these for a party? These bars are actually better on day two or three, as the flavors have time to meld. You can safely make them up to 3 days in advance and keep refrigerated. Add any whipped topping just before serving.
Q: Is there a dairy-free version of this recipe? While I haven’t personally tested a completely dairy-free version, readers have reported success using dairy-free cream cheese alternatives, coconut cream in place of heavy cream, and coconut oil instead of butter in the crust. The texture will be slightly different but still delicious.
Final Thoughts
Creating these Pumpkin Pie Cheesecake Bars has become something of an autumn ritual in my kitchen. There’s something deeply satisfying about the process—pressing the fragrant crust into the pan, watching the layers come together, and that moment when you take your first bite after patiently waiting for them to chill.
What I love most about this recipe is how it bridges the gap between everyday baking and special occasion desserts. These bars are approachable enough for a weeknight family treat but impressive enough to earn a place on your holiday table.
I encourage you to make this recipe your own. Perhaps you’ll add a hint of maple to the whipped cream, or maybe you’ll experiment with a pecan crust. Whatever personal touches you add, the harmonious combination of creamy cheesecake and spiced pumpkin is sure to create a memorable dessert experience.
Happy baking, and may your kitchen be filled with the comforting aromas of autumn!