There’s something magical about the combination of crisp peppermint chocolate and creamy cheesecake that makes my taste buds dance with joy. If you’ve never experienced the delight of a Peppermint Crisp Cheesecake, you’re in for a treat today! This iconic South African-inspired dessert transforms the beloved Peppermint Crisp chocolate bar into a showstopping cheesecake that will have your guests begging for seconds.
I’ve been perfecting this recipe for years, tweaking ingredients and methods until I achieved what I believe is the ultimate version. The contrast between the crunchy chocolate mint pieces and the velvety smooth cheesecake creates a texture sensation that’s simply irresistible. Whether you’re hosting a dinner party or simply treating yourself to something special, this Peppermint Crisp Cheesecake is guaranteed to impress.
What is Peppermint Crisp?
Before diving into the recipe, let me share a bit about the star ingredient. Peppermint Crisp is a chocolate bar created by Nestlé that features layers of crisp mint-flavored honeycomb covered in milk chocolate. It originated in South Africa and has become a cultural icon there, used in various desserts including the famous Peppermint Crisp Tart. The chocolate has a distinctive crunch and refreshing mint flavor that makes it perfect for incorporating into decadent desserts like our cheesecake.
If you can’t find Peppermint Crisp in your local stores (it can be tricky outside of South Africa and Australia), you can substitute with After Eight mints, Andes mints, or any mint chocolate that provides that refreshing flavor contrast. However, for the authentic experience, I recommend searching specialty shops or online retailers that stock international treats.
Essential Ingredients
For this spectacular dessert, you’ll need:
For the Base:
- 250g chocolate digestive biscuits (or graham crackers)
- 100g unsalted butter, melted
- 1 tablespoon cocoa powder
- 1 teaspoon peppermint extract (optional, for extra mint flavor)
For the Filling:
- 750g full-fat cream cheese, room temperature
- 250g mascarpone cheese
- 200g caster sugar
- 4 large eggs, room temperature
- 1 tablespoon vanilla extract
- 200ml heavy cream
- 3 tablespoons cornstarch
- 4 Peppermint Crisp bars (150g total), roughly chopped (reserve some for decoration)
For the Topping:
- 200ml heavy cream
- 3 tablespoons icing sugar
- 1 teaspoon peppermint extract
- Green food coloring (optional)
- 2 Peppermint Crisp bars, crushed
- 50g dark chocolate, for drizzling
Equipment Needed
Having the right tools on hand will make creating this dessert much easier:
- 9-inch (23cm) springform pan
- Food processor
- Electric mixer (stand or handheld)
- Large mixing bowls
- Measuring cups and spoons
- Spatula
- Whisk
- Sieve (for cornstarch)
- Parchment paper
- Cooling rack
- Serving plate
- Roasting tray (for water bath)
- Aluminum foil

Preparation Time
Let’s be honest about timing:
| Stage | Time Required |
|---|---|
| Preparation | 30 minutes |
| Baking | 60-70 minutes |
| Cooling | 1 hour at room temperature |
| Chilling | Minimum 6 hours, preferably overnight |
| Decorating | 20 minutes |
| Total Time | Approximately 8-9 hours (including chilling) |
Step-by-Step Instructions
Creating the Perfect Base
- Preheat your oven to 160°C (325°F) fan-forced.
- Grease and line the base and sides of your springform pan with parchment paper.
- Wrap the outside of the pan tightly with aluminum foil (at least 2 layers) to prevent water from seeping in during baking.
- Place the chocolate digestive biscuits in a food processor and pulse until you have fine crumbs.
- Add cocoa powder to the crumbs and pulse briefly to combine.
- Pour in the melted butter and peppermint extract (if using) and pulse until the mixture resembles wet sand.
- Transfer the mixture to your prepared springform pan.
- Using the back of a spoon or the bottom of a measuring cup, press the mixture firmly into the base of the pan and slightly up the sides.
- Refrigerate the base while you prepare the filling (at least 15 minutes).
I find that cooling the base thoroughly helps it hold together better during baking. The addition of cocoa powder gives it a richer chocolate flavor that complements the mint beautifully.
Crafting the Creamy Filling
- Reduce the oven temperature to 150°C (300°F).
- In a large mixing bowl, beat the cream cheese and mascarpone until smooth and free of lumps. Don’t overmix as this can incorporate too much air.
- Gradually add the caster sugar and beat until just combined.
- Add the eggs one at a time, beating briefly after each addition. Again, avoid overmixing.
- Pour in the vanilla extract and heavy cream, mixing until just incorporated.
- Sift the cornstarch over the mixture and fold in gently with a spatula.
- Gently fold in most of the chopped Peppermint Crisp pieces, reserving some for decoration.
The key to a perfect cheesecake texture is patience with mixing. I always make sure my ingredients are at room temperature before starting, which ensures a smoother filling without having to beat extensively.
Baking Method
- Remove the chilled base from the refrigerator.
- Pour the filling over the base, smoothing the top with a spatula.
- Tap the pan gently on the counter a few times to release any trapped air bubbles.
- Place the springform pan in a large roasting tray.
- Pour hot water into the roasting tray until it reaches about halfway up the sides of the springform pan (this creates a water bath).
- Carefully transfer to the preheated oven.
- Bake for 60-70 minutes, or until the edges are set but the center still has a slight wobble when gently shaken.
- Turn off the oven, leave the door slightly ajar, and allow the cheesecake to cool in the oven for 1 hour.
- Remove from the oven and let it cool completely at room temperature.
- Once cooled, refrigerate for at least 6 hours, preferably overnight.

The water bath is non-negotiable in my opinion. It creates a humid environment that prevents the cheesecake from cracking and helps it bake evenly. I’ve tried shortcuts, but this method consistently delivers the creamiest, most perfect texture.
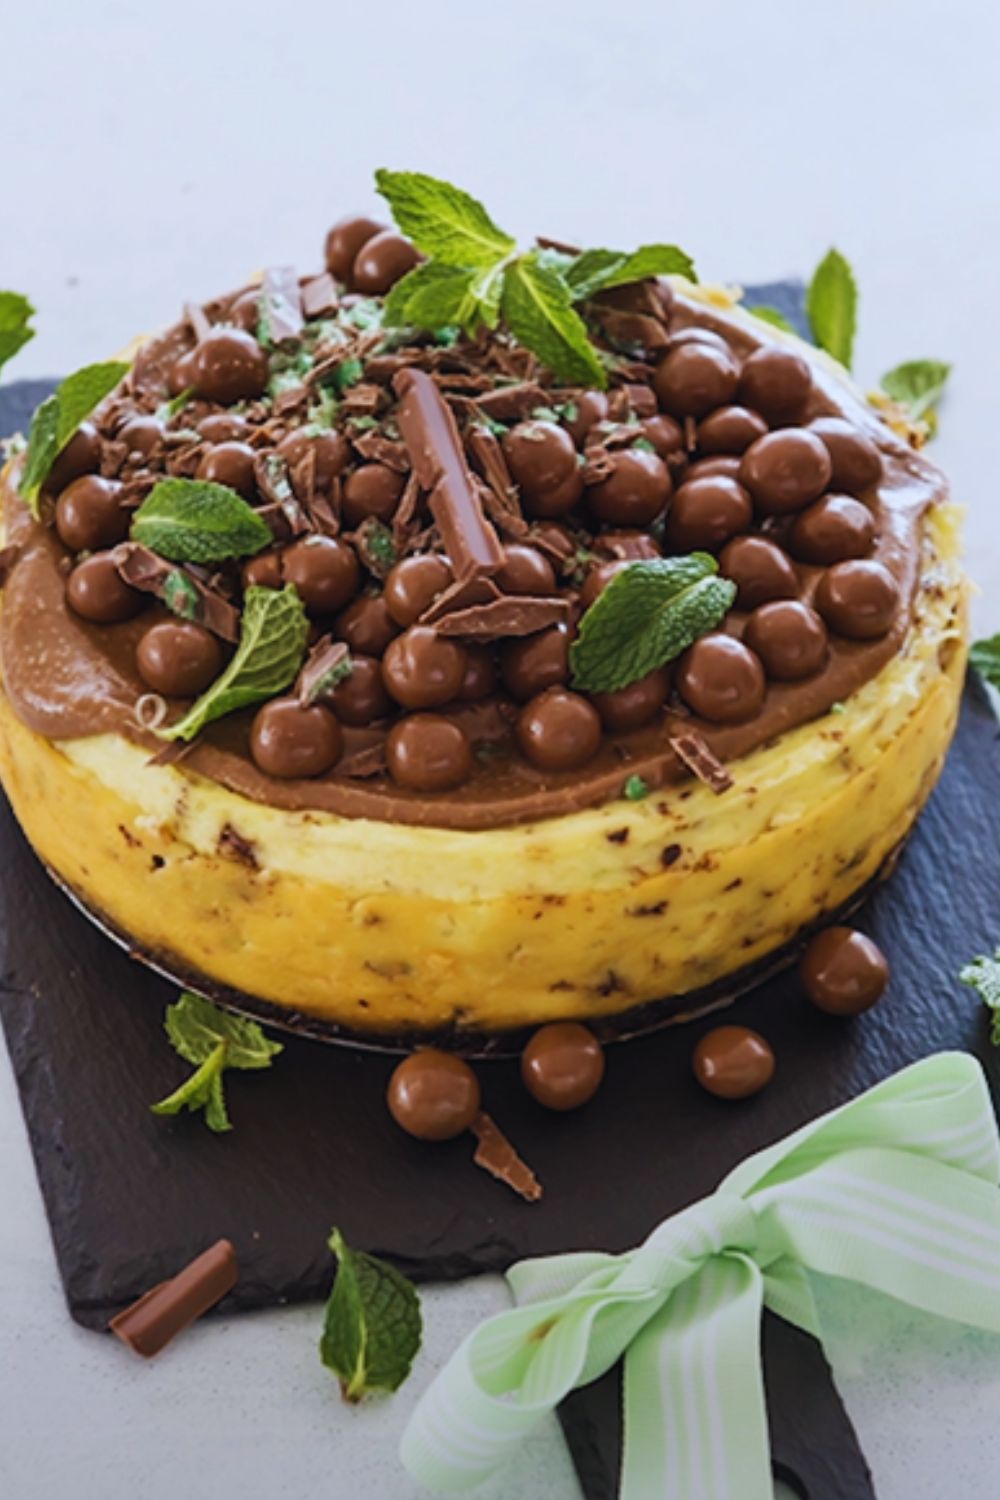
Decorative Topping
- Once the cheesecake has chilled completely, carefully remove it from the springform pan.
- In a clean mixing bowl, whip the heavy cream with icing sugar and peppermint extract until stiff peaks form.
- If desired, add a tiny drop of green food coloring to give a hint of mint color.
- Spoon or pipe the whipped cream onto the top of the cheesecake.
- Sprinkle generously with crushed Peppermint Crisp pieces.
- Melt the dark chocolate in short bursts in the microwave, stirring between each, until smooth.
- Drizzle the melted chocolate over the top of the cheesecake.
- Return to the refrigerator for at least 30 minutes to set before serving.
I love creating decorative patterns with the whipped cream using a piping bag fitted with a star nozzle. Sometimes I’ll pipe rosettes around the edge and pile the crushed Peppermint Crisp in the center for a more formal presentation.
Why This Recipe Works
After many trials and adjustments, I’ve found several key techniques that make this cheesecake exceptional:
Temperature Control
- Room temperature ingredients blend more smoothly with fewer lumps
- Gentle cooling prevents cracks and maintains creamy texture
- Thorough chilling sets the structure perfectly
Texture Balance
- The crisp chocolate pieces provide textural contrast to the smooth filling
- Adding cornstarch stabilizes the filling without making it too dense
- The water bath ensures even cooking and silky texture
Flavor Enhancement
- The combination of vanilla in the filling complements the mint perfectly
- Mascarpone adds richness without being too heavy
- The peppermint flavor intensifies as the cheesecake chills

Troubleshooting Common Issues
Even experienced bakers encounter problems occasionally. Here are solutions to common cheesecake challenges:
| Problem | Possible Cause | Solution |
|---|---|---|
| Cracked top | Overbeating, too high temperature | Use water bath, avoid overbeating, cool slowly |
| Soggy base | Water leakage from bath | Use multiple layers of heavy-duty foil |
| Filling too soft | Insufficient chilling, wrong ratio of ingredients | Chill longer, check measurements carefully |
| Uneven texture | Ingredients not at room temperature | Plan ahead to allow ingredients to warm up |
| Peppermint pieces sinking | Pieces too large | Chop finely and fold gently |
| Difficulty slicing | Knife not cleaned between cuts | Use warm, clean knife for each slice |
Serving Suggestions
I believe presentation is almost as important as taste when it comes to impressive desserts. Here are my favorite ways to serve this Peppermint Crisp Cheesecake:
- Pair with a shot of hot espresso to contrast with the cold, creamy cheesecake
- Serve with a small scoop of vanilla ice cream for an indulgent experience
- Add a sprig of fresh mint as a garnish
- Accompany with chocolate-dipped strawberries for elegant entertaining
- Spritz with a mint mist (peppermint extract diluted with water in a food-safe spray bottle) just before serving for an aromatic experience
- For special occasions, add edible gold leaf for a touch of luxury
Remember to remove the cheesecake from the refrigerator about 30 minutes before serving to take the chill off – this allows the flavors to fully develop on your palate.
Variations to Try
While the classic recipe is divine, I’ve experimented with these successful variations:
Chocolate Ganache Version
Replace the whipped cream topping with a rich chocolate ganache (equal parts hot cream and dark chocolate) infused with peppermint extract. Pour over the chilled cheesecake and then sprinkle with the Peppermint Crisp pieces.
No-Bake Alternative
For hot summer days, try a no-bake version by replacing eggs with additional whipped cream and gelatin to set the filling. The texture will be lighter but still delicious.
Mini Cheesecakes
Use a muffin tin lined with paper cases to create individual servings – perfect for parties or when you want portion control. Reduce baking time to about 25 minutes.
Chocolate Crust Variation
Add 2 tablespoons of melted chocolate to the biscuit base for an even richer chocolate experience that complements the mint beautifully.
Layered Version
Create a striking visual by dividing the filling into two parts, adding green food coloring to one half. Layer the plain filling first, then the green filling, swirling gently with a skewer for a marbled effect.
Storage Tips
Proper storage ensures your cheesecake stays fresh and delicious:
- Keep refrigerated in an airtight container for up to 5 days
- For freezing, wrap individual slices tightly in plastic wrap, then foil
- Frozen cheesecake will keep for up to 3 months
- Thaw frozen cheesecake overnight in the refrigerator
- Always store away from strongly aromatic foods as cheesecake can absorb odors
Nutritional Information
For those watching their intake, here’s an approximate nutritional breakdown per slice (based on 12 slices):
| Nutrient | Amount per Serving |
|---|---|
| Calories | 550 kcal |
| Fat | 42g |
| – of which saturates | 26g |
| Carbohydrates | 38g |
| – of which sugars | 32g |
| Protein | 7g |
| Salt | 0.5g |
| Fiber | 1g |
Remember that this is a special occasion dessert – sometimes indulgence is good for the soul!
Frequently Asked Questions
Can I make this cheesecake without a springform pan? Yes, you can use a regular cake pan lined with parchment paper with extra hanging over the edges to help lift it out. However, a springform pan makes removal much easier and results in a more attractive finish.
My Peppermint Crisp pieces are melting during baking. What am I doing wrong? This can happen if the pieces are too small. Try freezing the chopped Peppermint Crisp for 30 minutes before folding into the filling.
Can I make this recipe gluten-free? Absolutely! Simply substitute the digestive biscuits with gluten-free cookies. I’ve had great results with gluten-free graham crackers and chocolate rice cookies.
How do I know when my cheesecake is perfectly baked? The perfect cheesecake should have a slight wobble in the center when gently shaken – about a 2-inch circle in the middle. It will continue to set as it cools. If it’s completely firm when baking finishes, it’s likely overbaked.
Can I reduce the sugar content? You can reduce the sugar by up to 25% without significantly affecting the texture. However, the sweetness balances the mint flavor, so I wouldn’t recommend cutting it further.
Is there a dairy-free version? This is challenging but possible. Use dairy-free cream cheese substitutes and coconut cream instead of heavy cream. The texture will be different but still delicious.
Why did my cheesecake sink in the middle? Sudden temperature changes can cause sinking. Always cool your cheesecake gradually in the turned-off oven with the door ajar. Also, avoid overbeating the filling as excess air can cause rising and then sinking.
Can children help make this recipe? Absolutely! Children can crush the biscuits (in a sealed bag with a rolling pin), press the base into the pan, and help with decorating. Adult supervision would be needed for the baking stage.
Final Thoughts
Creating the perfect Peppermint Crisp Cheesecake has been a journey of discovery for me. What began as an attempt to recreate a nostalgic South African flavor has become one of my signature desserts. The combination of cool mint, crisp chocolate texture, and creamy cheesecake creates a symphony of flavors that never fails to delight.
Remember that practice makes perfect with cheesecakes. If your first attempt isn’t flawless, don’t be discouraged. Each time you make it, you’ll learn something new about temperature, timing, or technique that will improve your next creation.
I hope this recipe brings as much joy to your table as it has to mine. There’s something truly special about watching someone’s face light up when they take their first bite of this extraordinary dessert. Happy baking!