There’s something magical about biting into a warm, fluffy bun filled with spiced potato curry. The aromatic blend of spices, the soft texture of the bread, and that perfect kick from homemade sambal—it’s a match made in culinary heaven! Today, I’m sharing my absolute favorite recipe for vegan baked curry potato buns paired with a zingy homemade sambal that will absolutely transform your home cooking game.
I discovered this recipe during my travels through Southeast Asia, where street vendors would sell these delicious buns in the early mornings. After countless attempts to recreate that perfect balance of flavors in my own kitchen, I’ve finally mastered a version that I believe captures the essence of those unforgettable street-side treats—with a vegan twist, of course!
What makes these buns special is the combination of a pillowy soft dough that envelops a fragrant potato filling, all baked to golden perfection. And when paired with the fiery sambal? Pure bliss. The best part? You don’t need to be a professional baker to make these—I’ve simplified the process while preserving all the authentic flavors.
The Perfect Dough
The foundation of any great bun is its dough. For these curry potato buns, we need something that’s light and fluffy but sturdy enough to hold our flavorful filling. My secret is using a touch of coconut milk in the dough, which adds a subtle richness that pairs beautifully with the curry filling.
Ingredients for the Dough
- 4 cups all-purpose flour
- 1 tablespoon instant yeast
- 3 tablespoons organic cane sugar
- 1 teaspoon salt
- 1 cup coconut milk, lukewarm
- ½ cup water, lukewarm
- 3 tablespoons vegetable oil
- 1 tablespoon white vinegar (helps activate the yeast)
Method for the Perfect Dough
- In a large bowl, whisk together the flour, yeast, sugar, and salt.
- In a separate container, combine the lukewarm coconut milk, water, oil, and vinegar.
- Make a well in the center of the flour mixture and pour in the wet ingredients.
- Using a wooden spoon, mix until a shaggy dough forms.
- Transfer to a floured surface and knead for about 8-10 minutes until smooth and elastic. The dough should spring back when lightly pressed.
- Place the dough in an oiled bowl, cover with a damp cloth, and let rise in a warm place for 1-1.5 hours until doubled in size.
I find the dough rising process to be almost meditative—there’s something so satisfying about watching that ball of dough slowly expand and knowing that transformation is happening right before your eyes.
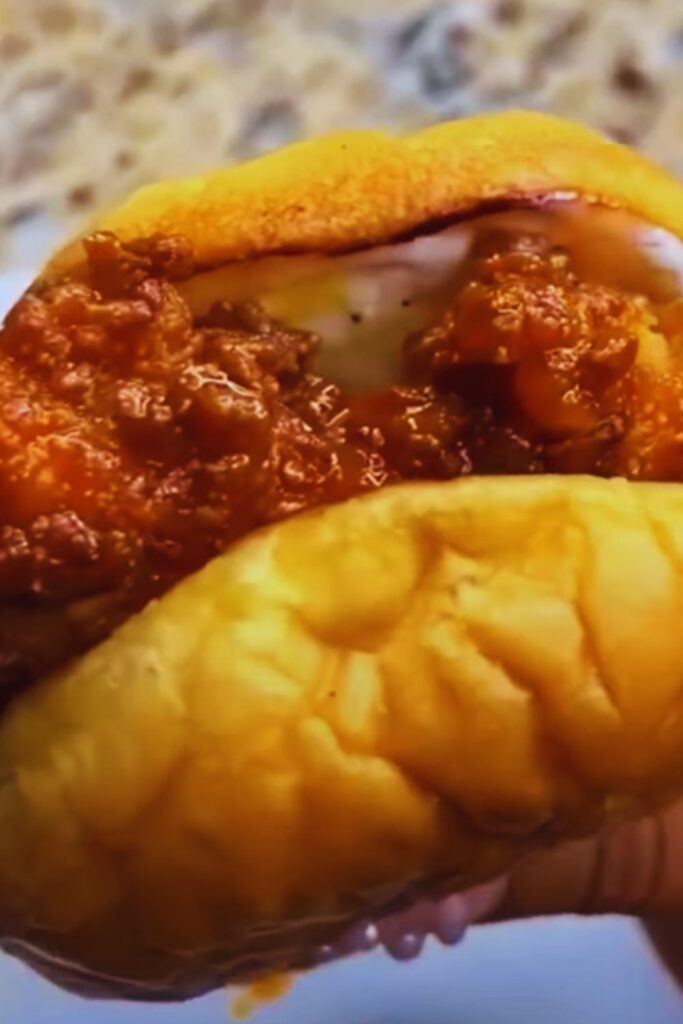
The Flavorful Curry Potato Filling
Now, let’s talk about the star of our show: the curry potato filling. This aromatic filling is what sets these buns apart from any other bread you’ve tried. The key is to balance the spices perfectly and ensure the potatoes are cooked until tender but not mushy.
Ingredients for Curry Potato Filling
- 4 large potatoes (about 2 pounds), peeled and diced into small cubes
- 2 tablespoons vegetable oil
- 1 large onion, finely diced
- 4 cloves garlic, minced
- 1-inch piece of ginger, grated
- 2 green chilies, finely chopped (adjust according to heat preference)
- 2 tablespoons curry powder
- 1 teaspoon ground turmeric
- 1 teaspoon ground cumin
- 1 teaspoon ground coriander
- ½ teaspoon garam masala
- 1 teaspoon salt (adjust to taste)
- ½ cup frozen peas
- ¼ cup chopped fresh cilantro
- Juice of half a lemon
Method for the Curry Potato Filling
- Boil the diced potatoes in salted water until just tender, about 10-12 minutes. Drain well and set aside.
- Heat oil in a large skillet over medium heat. Add the onions and sauté until translucent, about 5 minutes.
- Add the garlic, ginger, and green chilies, cooking for another 2 minutes until fragrant.
- Add all the dry spices (curry powder, turmeric, cumin, coriander, garam masala, and salt). Stir constantly for 30 seconds to toast the spices without burning them.
- Add the boiled potatoes and stir gently to coat them with the spice mixture.
- Fold in the frozen peas and cook for 2-3 minutes until the peas are heated through.
- Remove from heat and stir in the chopped cilantro and lemon juice.
- Allow the filling to cool completely before using it to fill the buns.
The aromas that fill my kitchen when making this filling are simply intoxicating. I often find myself taking deep breaths just to savor the scent of those toasted spices mingling with the onions and garlic. It’s like a preview of the deliciousness to come!
Homemade Fiery Sambal
A good sambal can elevate any dish from good to extraordinary, and these curry potato buns are no exception. My homemade sambal recipe has just the right balance of heat, acidity, and umami that cuts through the richness of the buns perfectly.
Ingredients for Homemade Sambal
- 15-20 red chilies (use a mix of spicy and mild varieties)
- 6 cloves garlic
- 1-inch piece of ginger
- 2 shallots
- 1 tablespoon tamarind paste
- 1 tablespoon brown sugar
- 1 teaspoon salt
- 3 tablespoons vegetable oil
- 1 tablespoon lime juice
Method for Homemade Sambal
- Remove the stems from the chilies. For a milder sambal, deseed some or all of the chilies.
- In a food processor, blend chilies, garlic, ginger, and shallots into a rough paste. Add a splash of water if needed to help the blending process.
- Heat oil in a small saucepan over medium heat.
- Add the chili paste and cook, stirring frequently, for about 5-7 minutes until the raw smell disappears and the oil starts to separate.
- Add the tamarind paste, brown sugar, and salt. Continue cooking for another 3-4 minutes.
- Remove from heat and stir in the lime juice.
- Allow to cool completely. The sambal will keep in an airtight container in the refrigerator for up to 2 weeks.
I’ve learned through multiple taste tests (and several burnt tongues!) that allowing the sambal to rest for at least a few hours before serving lets the flavors meld together beautifully. If you can make it a day ahead, even better!
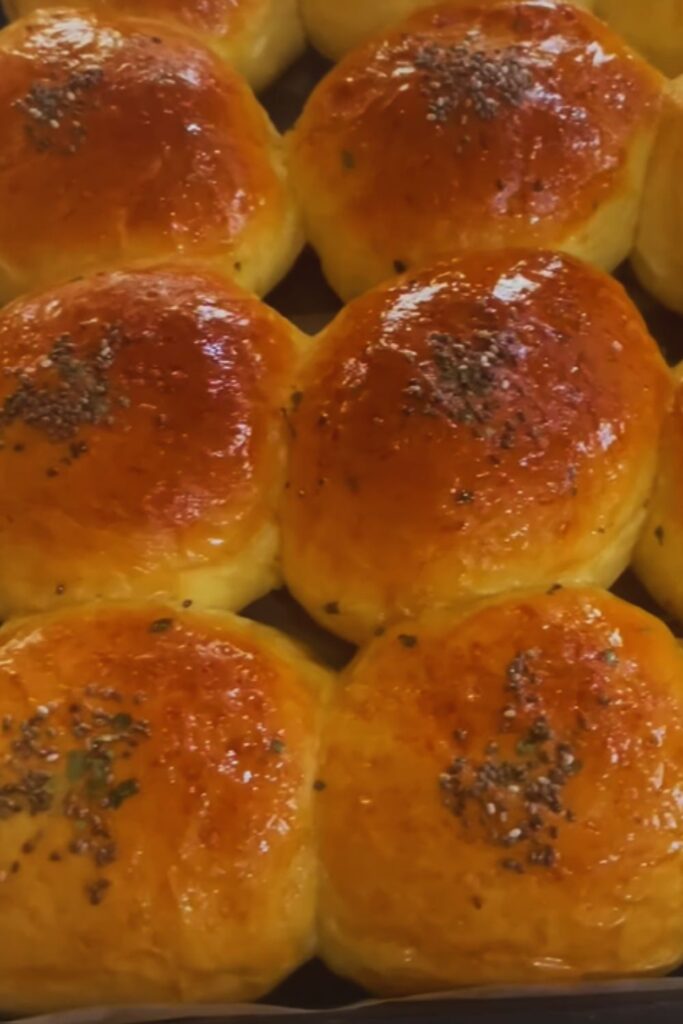
Assembling and Baking the Buns
Now comes the fun part—bringing everything together! This is where your buns take shape, and with a few simple techniques, you’ll get that professional bakery look with minimal effort.

Method for Assembling and Baking
- After the dough has doubled in size, punch it down gently to release air bubbles.
- Divide the dough into 12 equal portions (about 85-90g each if you’re using a scale).
- Take one portion of dough and flatten it into a disc about 5 inches in diameter, making the edges slightly thinner than the center.
- Place about 2 tablespoons of the cooled potato filling in the center.
- Bring the edges of the dough up and around the filling, pinching to seal.
- Place the bun, seam side down, on a parchment-lined baking sheet.
- Repeat with the remaining dough and filling, spacing the buns about 2 inches apart.
- Cover the buns with a clean kitchen towel and let them prove for another 30-40 minutes until slightly puffy.
- Preheat your oven to 375°F (190°C) during the last 15 minutes of proving.
- For a golden finish, gently brush the buns with a mixture of 1 tablespoon plant milk and 1 teaspoon maple syrup.
- Optional: Sprinkle with sesame seeds or nigella seeds for extra flavor and visual appeal.
- Bake for 15-18 minutes until golden brown.
- Transfer to a wire rack to cool slightly before serving.
I find that the most challenging part of this process is getting the right amount of filling in each bun. Too little and the buns will be disappointingly empty; too much and they might burst during baking. After making these countless times, I’ve found that 2 tablespoons of filling is just right for the dough weight specified.
Nutritional Profile
For those who are health-conscious or simply curious about what they’re eating, I’ve put together this nutritional breakdown per bun. These values are approximate and may vary depending on specific ingredients used.
| Nutrient | Amount per Bun | % Daily Value* |
|---|---|---|
| Calories | 285 | 14% |
| Total Fat | 7g | 9% |
| – Saturated Fat | 2g | 10% |
| – Trans Fat | 0g | – |
| Cholesterol | 0mg | 0% |
| Sodium | 325mg | 14% |
| Total Carbohydrate | 48g | 17% |
| – Dietary Fiber | 3g | 11% |
| – Total Sugars | 5g | – |
| – Added Sugars | 3g | 6% |
| Protein | 6g | 12% |
| Vitamin D | 0mcg | 0% |
| Calcium | 25mg | 2% |
| Iron | 2mg | 11% |
| Potassium | 350mg | 7% |
*Percent Daily Values are based on a 2,000 calorie diet
Storage and Reheating Tips
These buns are at their absolute best when fresh from the oven, but they do store remarkably well. Here’s how I keep them fresh:
Storage Options
- Room Temperature: Store in an airtight container for up to 2 days.
- Refrigerator: Keep in an airtight container for up to 5 days.
- Freezer: Wrap individual buns tightly in plastic wrap, then place in a freezer bag. They’ll keep for up to 3 months.
Reheating Methods
- From Room Temperature: Warm in a 300°F (150°C) oven for 5-7 minutes or microwave for 20-30 seconds.
- From Refrigerated: Warm in a 300°F (150°C) oven for 8-10 minutes or microwave for 40-45 seconds.
- From Frozen: Thaw overnight in the refrigerator, then reheat as above. Alternatively, reheat from frozen in a 300°F (150°C) oven for 15-20 minutes.
I personally prefer reheating these in the oven whenever possible, as it helps restore that lovely crisp exterior while keeping the inside soft and steamy.
Serving Suggestions
These curry potato buns are incredibly versatile and can be enjoyed in various ways:
- As a satisfying breakfast with a cup of hot chai tea
- For lunch alongside a fresh green salad
- As an afternoon snack with a dollop of extra sambal
- As part of a larger spread for casual entertaining
- In a lunch box (they travel exceptionally well!)
- Paired with coconut yogurt for a cooling contrast
- With a side of pickled vegetables for added tang and crunch
- Alongside a warming soup for a complete meal
When I’m entertaining guests, I like to serve these buns slightly warm with little bowls of extra sambal, coconut yogurt, and some fresh herbs for people to customize their experience.
Troubleshooting Common Issues
Even experienced bakers sometimes encounter challenges. Here are solutions to the most common issues you might face when making these buns:
| Problem | Possible Cause | Solution |
|---|---|---|
| Dough isn’t rising | Yeast is old or inactive | Use fresh yeast and ensure liquids are lukewarm, not hot |
| Filling leaks during baking | Too much filling or seams not properly sealed | Use less filling and pinch seams tightly, then place seam-side down |
| Buns are dense, not fluffy | Insufficient kneading or rising time | Knead dough until elastic and allow proper rising time in a warm place |
| Buns are too pale | Oven temperature too low or insufficient browning agent | Increase oven temperature slightly or brush with plant milk and maple syrup mixture |
| Filling is bland | Under-seasoning | Taste filling before assembling and adjust spices accordingly |
| Sambal is too hot | Too many hot chilies used | Balance with more sugar, tamarind, or mix in some coconut cream |
| Buns stuck to the pan | No parchment paper used | Always line baking sheet with parchment or silicone mat |
The most valuable lesson I’ve learned from my baking adventures is that consistency comes with practice. Don’t be discouraged if your first batch isn’t perfect—each time you make these buns, you’ll get better at handling the dough and judging the right amount of filling.
Variations to Try
One of the joys of cooking is making a recipe your own. Here are some delicious variations I’ve experimented with over time:
Filling Variations
- Sweet Potato Curry: Substitute sweet potatoes for regular potatoes for a slightly sweeter filling.
- Lentil and Vegetable: Add red lentils and finely chopped bell peppers to the curry for extra protein and texture.
- Cauliflower and Pea: Use finely chopped cauliflower instead of potatoes for a lower-carb option.
- Mushroom and Spinach: Add sautéed mushrooms and wilted spinach to the basic curry mix for an earthier flavor profile.
Dough Variations
- Whole Wheat: Replace up to half the all-purpose flour with whole wheat flour for a nuttier taste and more fiber.
- Turmeric Dough: Add 1 teaspoon of turmeric to the dough for a beautiful yellow color and subtle flavor.
- Herb-Infused: Mix 2 tablespoons of finely chopped herbs (like cilantro or scallions) into the dough.
- Garlic Dough: Add 2 teaspoons of garlic powder to the dry ingredients for a savory note.
Sambal Variations
- Sambal Matah: Make a Balinese-style raw sambal with shallots, lemongrass, and kaffir lime leaves.
- Pineapple Sambal: Add some finely diced pineapple for a sweet-spicy condiment.
- Roasted Tomato Sambal: Incorporate roasted tomatoes for a deeper, smokier flavor.
- Green Sambal: Use green chilies, cilantro, and mint for a fresh, herbaceous alternative.
I love experimenting with different combinations—my current favorite is the sweet potato curry filling with the turmeric dough. The colors and flavors are simply stunning together!
Frequently Asked Questions
After sharing this recipe with friends and family over the years, I’ve collected the most common questions people ask. Here are my answers:
Q: Can I make the dough ahead of time? Yes! You can prepare the dough and let it rise in the refrigerator overnight. Just punch it down after the first rise, cover tightly with plastic wrap, and refrigerate. Allow it to come to room temperature for about 30 minutes before shaping the buns.
Q: How spicy are these buns? The buns themselves are mild to moderately spicy, depending on how many green chilies you add to the filling. The sambal is where the real heat comes in, and you can adjust it by using fewer hot chilies or removing the seeds.
Q: Can I make these gluten-free? While I haven’t personally tested a gluten-free version, you could try using a 1:1 gluten-free flour blend designed for bread baking. Note that you may need to adjust the liquid quantities and the texture will likely be different.
Q: How do I know when the buns are properly baked? The buns should be golden brown on top and sound hollow when tapped on the bottom. If you’re unsure, you can use a food thermometer—the internal temperature should reach about 190°F (88°C).
Q: Can I use store-bought sambal instead of making my own? Absolutely! While homemade sambal offers the freshest flavor, a good quality store-bought sambal oelek works well as a time-saving alternative. Just taste it first and adjust with a bit of lime juice or sugar if needed.
Q: What if I don’t have coconut milk for the dough? Any plant-based milk will work fine as a substitute, though coconut milk adds a subtle richness that complements the curry flavors. Almond or oat milk would be my next choices.
Q: Can children eat these buns? Yes! For a kid-friendly version, reduce or omit the green chilies in the filling and serve without the sambal. Most children enjoy the mild curry flavor of the filling.
Q: How can I make a larger batch for a party? The recipe doubles beautifully. Just make sure you have enough oven space or plan to bake in batches, allowing the shaped buns to continue proving at room temperature until it’s their turn in the oven.
Final Thoughts
There’s something deeply satisfying about creating these curry potato buns from scratch. The process engages all your senses—from feeling the dough transform under your hands to inhaling the aromatic spices and finally tasting the perfect balance of flavors.
What I love most about this recipe is how it brings together diverse culinary traditions into something uniquely delicious. The soft, pillowy buns reminiscent of Chinese baozi, the aromatic Indian-inspired curry filling, and the fiery Southeast Asian sambal create a cross-cultural culinary experience that always impresses.
Whether you’re an experienced baker looking to try something new or a cooking novice seeking to expand your repertoire, these vegan curry potato buns with homemade sambal are well worth the effort. They’re perfect for weekend baking projects, make-ahead meals, or when you simply want to fill your home with incredible aromas and create something special to share with loved ones.
So roll up your sleeves, gather your ingredients, and prepare for a baking adventure that will reward you with some truly spectacular buns. I guarantee that once you’ve tried them, they’ll become a regular feature in your cooking rotation—they certainly have in mine!
Q&A Section
Q: What’s the most important tip for getting the perfect texture in the buns? Don’t rush the kneading or rising process. Properly developed gluten and full rises are what give these buns their signature fluffy texture. I find that kneading for a full 8-10 minutes makes a significant difference in the final product.
Q: Can I prepare everything the night before and bake in the morning? Absolutely! Prepare both the filling and the sambal a day ahead. For the dough, you can let it go through its first rise, then shape the buns, place them on the baking sheet and immediately refrigerate overnight, covered loosely with plastic wrap. In the morning, let the buns sit at room temperature for about 30-45 minutes before baking.
Q: What’s the best way to get uniform-sized buns? I recommend using a kitchen scale to weigh each portion of dough. Aim for 85-90g per portion for the size specified in this recipe. This ensures even baking and a consistent filling-to-dough ratio.
Q: My sambal seems too watery. How can I fix it? Continue cooking it on low heat until more moisture evaporates. The oils should eventually separate from the solids, giving you that classic sambal consistency. Just be careful not to burn it – stir frequently and keep the heat moderate.